D, a data engineer with a knack for solving complex problems, recently faced a challenging task. A client needed a smart way to manage their data in Power BI, especially after acquiring new companies. This meant separating newly acquired third-party data from their existing internal data, while also ensuring that historical data remained intact and accessible. The challenge? This process involved refreshing large data sets, sometimes as many as 25 million rows for a single year, just to incorporate a few thousand new entries. This task was not just time-consuming but would also put a strain on computational resources.
At first glance, Power BI’s Custom Partitions seemed like a promising solution. It would allow D to organize data neatly, separating third-party data from internal data as the client wanted. However, Power BI typically partitions data by date, not by the source or type of data, which made combining Custom Partitions with Incremental Refresh—a method that updates only recent changes rather than the entire dataset—a bit of a puzzle.
Limitations of Custom Partition and Incremental Refresh in Power BI
Custom Partitions offer the advantage of dividing the table into different parts based on the conditions defined, enabling selective loading of partitions during refreshes. However, Power BI’s built-in Incremental Refresh feature, while automated and convenient, has limitations in terms of customization. It primarily works on date columns, making it challenging to partition the table based on non-date columns like ‘business region’.

Incremental Refresh Pros:
- Creation of partitions is automated, and the updation of partitions based on date is also automated, no manual intervention is needed.
Incremental Refresh Cons:
- Cannot have two separate logics defined for partition of data based on flag column.
- Cannot support the movement of data using the Power BI Pipeline feature.
Custom Partitions Pros:
- Can create partitions of our own logical partitions.
- Can support the movement of data using the Power BI Pipeline Feature.
Custom Partitions Cons:
- All the processes should be done manually.
To tackle these challenges, D came up with another solution. By using custom C# scripts and Azure Functions, D found a way to integrate Custom Partitions with an Incremental Refresh in the Power BI model. This solution not only allowed for efficient management of third-party and internal data but also streamlined the refresh process. Additionally, D utilized Azure Data Factory to automate the refresh process based on specific policies, ensuring that data remained up-to-date without unnecessary manual effort.
This is how we at Tiger Analytics, solved our client’s problem and separated third-party data. In this blog, we’ll explore the benefits of combining Custom Partitions with Incremental Refresh. Based on our experiences, how this combination can enhance data management in Power BI and provide a more efficient and streamlined approach to data processing.
Benefits of combining Incremental Refresh with Custom Partitions in Power BI
Merging the capabilities of Incremental Refresh with Custom Partitions in Power BI offers a powerful solution to overcome the inherent limitations of each approach individually. This fusion enables businesses to fine-tune their data management processes, ensuring more efficient use of resources and a tailored fit to their specific data scenarios.
Leveraging tools like Azure Function Apps, the Table Object Model (TOM) library, and Power BI’s XMLA endpoints, automating the creation and management of Custom Partitions becomes feasible. This automation grants the flexibility to design data partitions that meet precise business needs while enjoying the streamlined management and automated updates provided by Power BI.

Optimizing Query Performance:
- Custom Partitions improve query performance by dividing data into logical segments based on specific criteria, such as a flag column.
- When combined with an Incremental Refresh, only the partitioned data that has been modified or updated needs to be processed during queries.
- This combined approach reduces the amount of data accessed, leading to faster query response times and improved overall performance.
Efficient Data Refresh:
- Incremental Refresh allows Power BI to refresh only the recently modified or added data, reducing the time and resources required for data refreshes.
- When paired with Custom Partitions, the refresh process can be targeted to specific partitions, rather than refreshing the entire dataset.
- This targeted approach ensures that only the necessary partitions are refreshed, minimizing processing time and optimizing resource utilization.
Enhanced Data Organization and Analysis:
- Custom Partitions provide a logical division of data, improving data organization and making it easier to navigate and analyze within the data model.
- With Incremental Refresh, analysts can focus on the most recent data changes, allowing for more accurate and up-to-date analysis.
- The combination of Custom Partitions and Incremental Refresh enables more efficient data exploration and enhances the overall data analysis process.
Scalability for Large Datasets:
- Large datasets can benefit significantly from combining Custom Partitions and Incremental Refresh.
- Custom Partitions allow for efficient querying of specific data segments, reducing the strain on system resources when dealing with large volumes of data.
- Incremental Refresh enables faster and more manageable updates to large datasets by focusing on the incremental changes, rather than refreshing the entire dataset.
Implementation Considerations:
- Combining Custom Partitions and Incremental Refresh may require a workaround, such as using calculated tables and parameters.
- Careful planning is necessary to establish relationships between the partition table, data tables, and Incremental Refresh configuration.
- Proper documentation and communication of the combined approach are essential to ensure understanding and maintainability of the solution.
How to implement Incremental Refresh and Custom Partitions: A step-by-step guide
Prerequisites:
Power BI Premium Capacity or PPU License: The use of XMLA endpoints, which are necessary for managing Custom Partitions, is limited to Power BI Premium capacities. Alternatively, you can utilize Power BI premium-per-user (PPU) licensing to access these capabilities.
PPU: https://learn.microsoft.com/en-us/power-bi/enterprise/service-premium-per-user-faq
Xmla Reference: https://learn.microsoft.com/en-us/power-bi/enterprise/service-premium-connect-tools
Dataset Published to Premium Workspace: The dataset for implementing Custom Partitions and Incremental Refresh should be published to a Power BI Premium workspace.
Permissions for Azure Functions and Power BI Admin Portal: To automate the creation and management of Custom Partitions, you need the appropriate permissions. This includes the ability to create and manage Azure Functions and the necessary rights to modify settings in Power BI’s Admin portal.
- In the Function App, Navigate to Settings -> Identity and Turn On the system assigned.
- Next, create a security group in Azure and add the function App as a member.
- Go to Power BI, navigate to the Admin portal, and add the security group to the Admin API setting that allows service principles to use Power BI APIs.
- Go to Workspace, Go for access, and Add the function as a member to the Workspace.
Check Incremental Refresh Policy: The Incremental Refresh policy needs to be false to create partitions on the table (through code).

Fulfilling these prerequisites will enable effective utilization of Custom Partitions and Incremental Refresh in Power BI.
Implementation at a glance:
Create an Azure Function with .NET as the Runtime Stack: Begin by adding the necessary DLL files for Power BI model creation and modification to the Azure Function console.
Connect to the Power BI Server Using C# Code: Establish a connection by passing the required connection parameters, such as the connection string and the table name where partitions need to be implemented. (C# code and additional details are available in the GitHub link provided in the note section).
Develop Code for Creating Partitions: Utilize the inbuilt functions from the imported DLL files to create partitions within the Power BI server.
Implement Code for Multiple Partitions: Use a combination of for-loop and if-conditions to develop code capable of handling multiple partitions.
There are two types of data partitions to consider based on the Flag value:
- Flag Value ‘Y’ will be stored in a single partition, referred to as the ABC Partition.
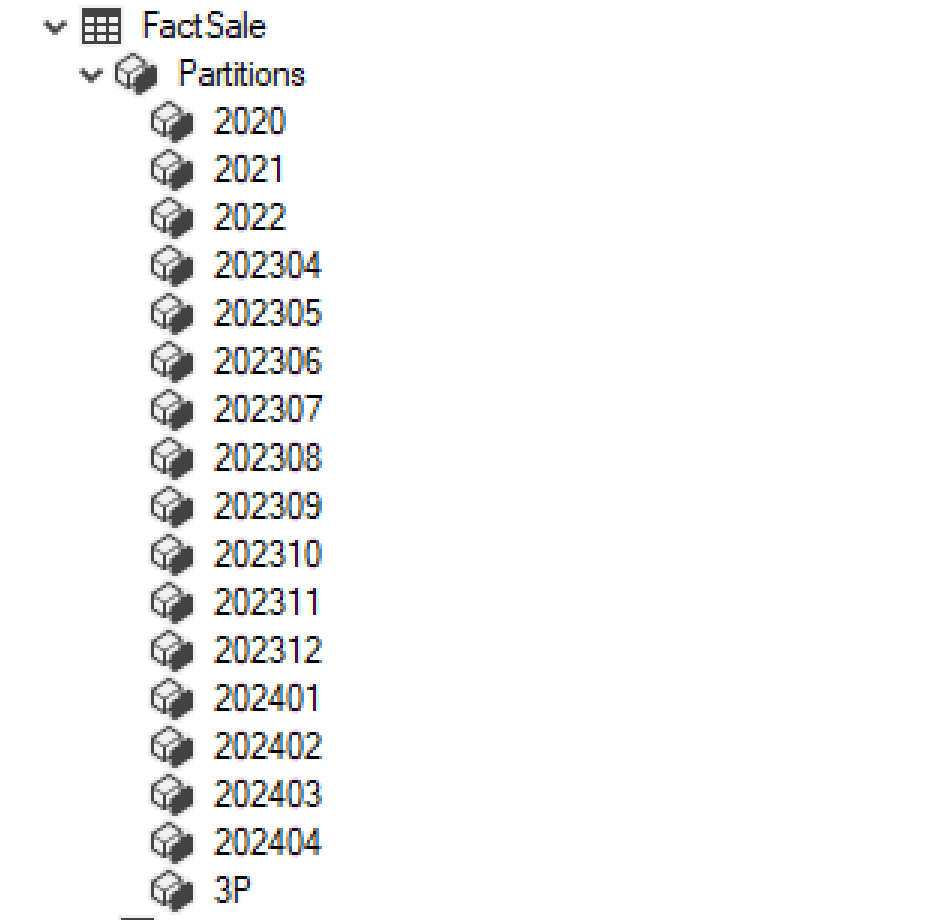
- Flag Value ‘N’ will be partitioned based on the date column, adhering to the incremental logic implemented. (Examples of partition naming include 2020, 2021, 2022, 202301, 202302, 202303, etc., up to 202312, 202401, 202402).
Check and Create ABC Partition if it does not exist: The initial step in the logic involves verifying the existence of the ABC Partition. If it does not exist, the system should create it.
Implement Logic Within the Looping Block:
- The first action is to verify the existence of yearly partitions for the last three years. If any are missing, they should be created.
- Next, combine all partitions from the previous year into a single-year partition.
- Subsequently, create new partitions for the upcoming year until April.
- Any partitions outside the required date range should be deleted.
Automate Partition Refresh with a Pipeline: Establish a pipeline designed to trigger the Azure function on the 1st of April of every year, aligning with the business logic.
Partition Logical flow:

Step-by-Step implementation:
-
From the home dashboard, search for and select the Function App service. Enter all necessary details, review the configuration, and click ‘Create’.

-
Configure the function’s runtime settings.

-
Check the Required dll’s

-
Navigate to Development Tools -> Advanced Tools -> Go


-
Give CMD -> site -> wwwroot -> new function name -> bin and paste all dll’s

-
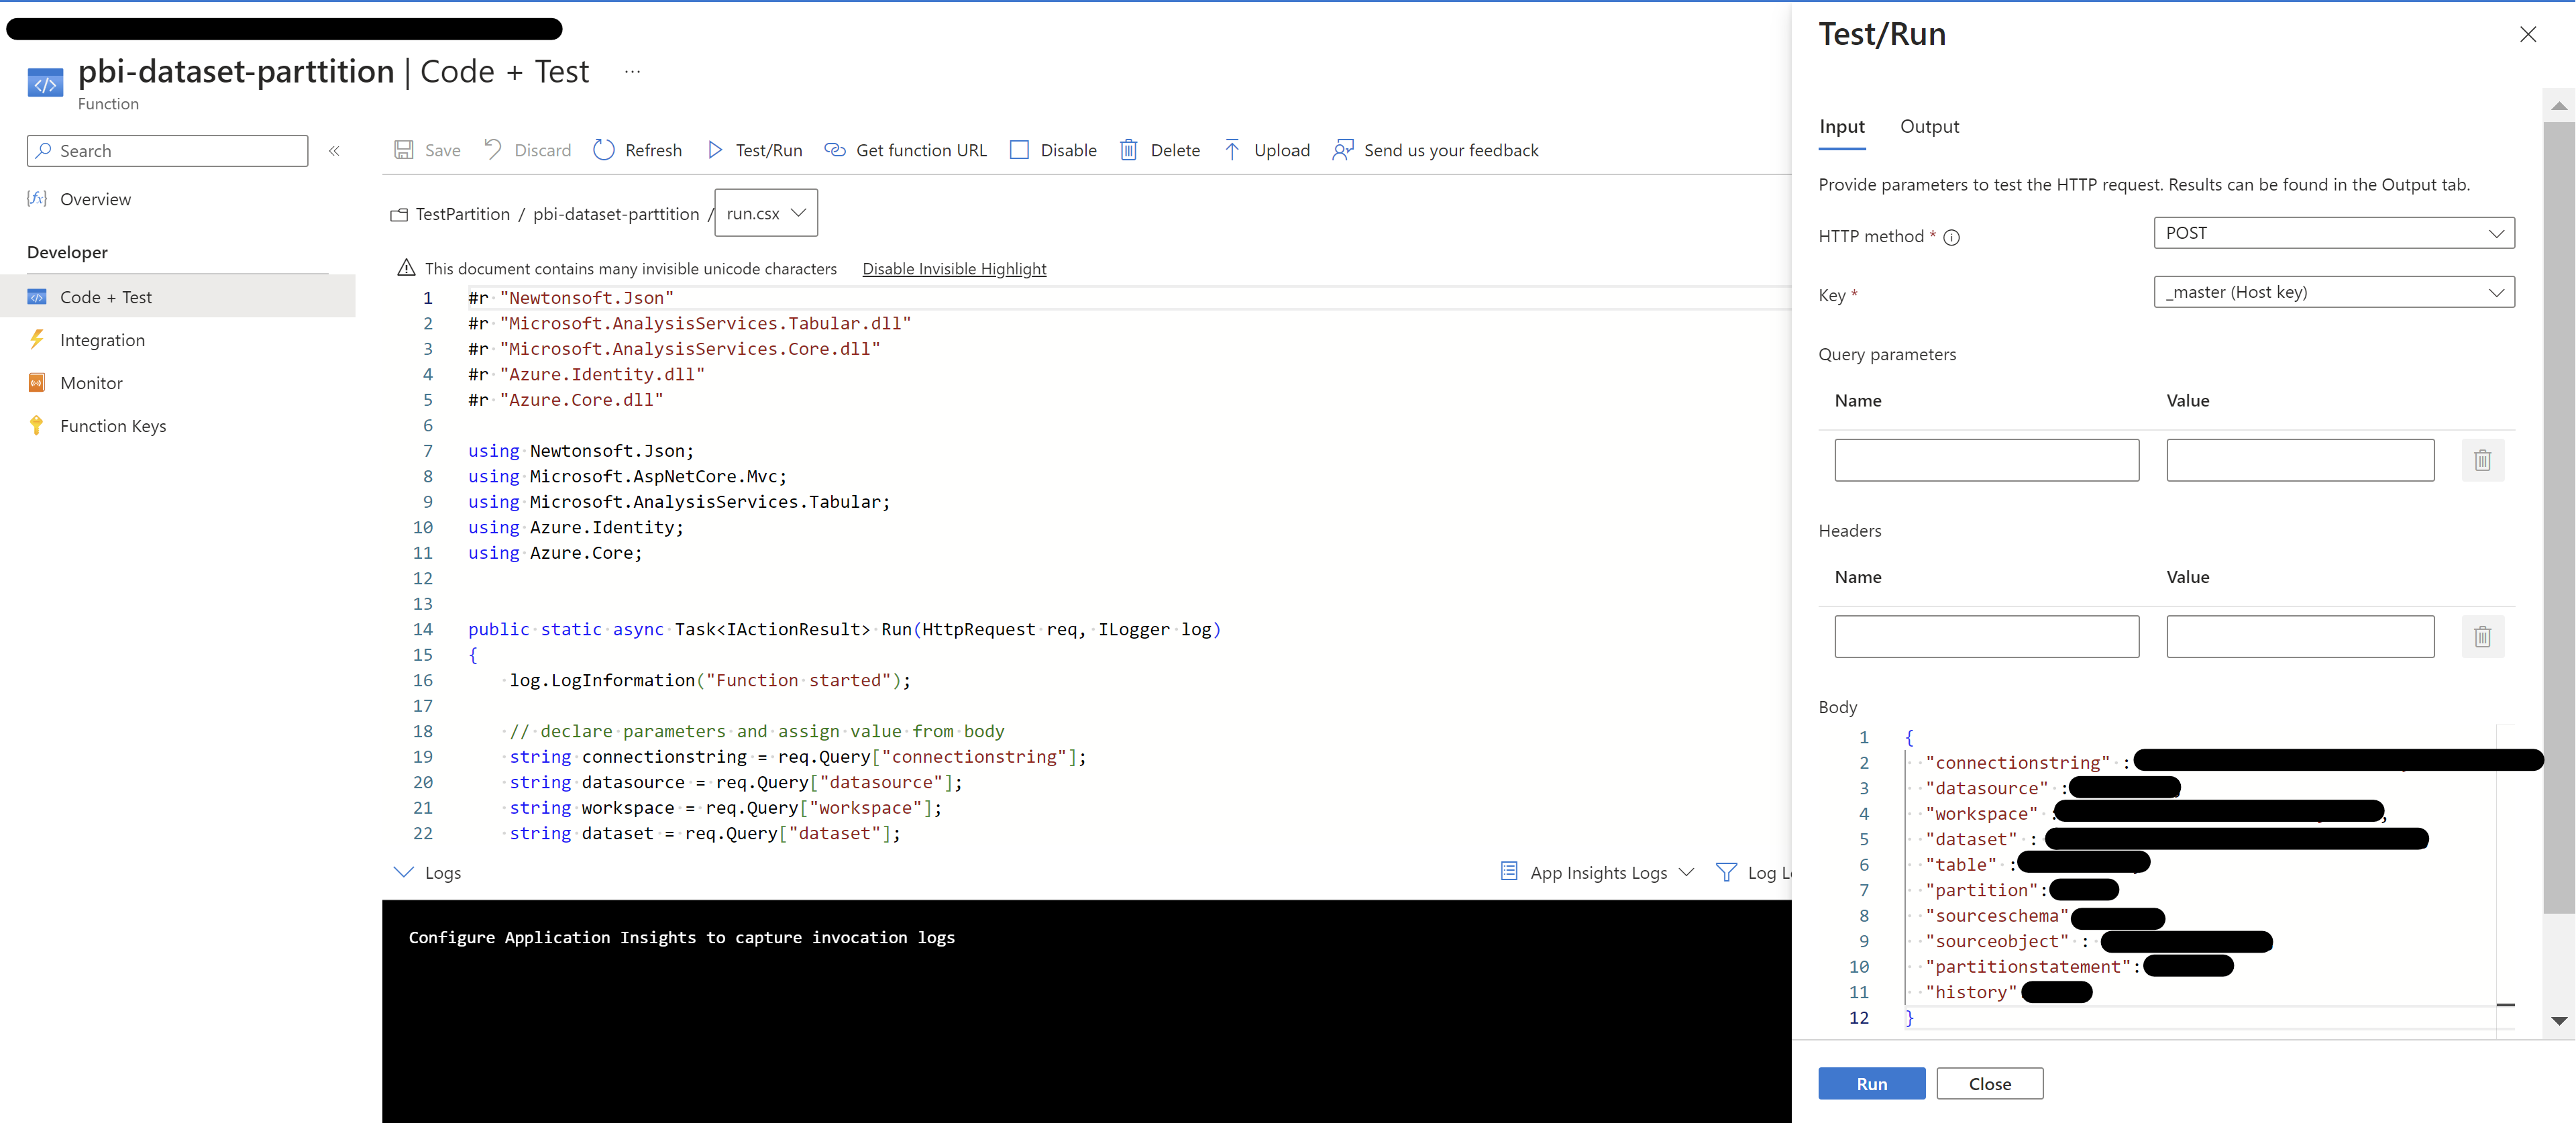
The primary coding work, including the creation of partitions, is done in the run.csx file. This is where you’ll write the C# code.

-
The Partitions should be as below:


Input body to the function:{ "connectionstring":"Connection details", "datasource": "datasource name", "workspace": "workspace name", "dataset": "dataset name", "table": "Table name", "partition": "Y", "sourceschema": "Schema name", "sourceobject": "Source object Name table or view name", "partitionstatement": "Year", "history": "2" }
Refresh the selected partition using Azure Pipeline:

- Create Azure Pipeline, which uses web activity to call the Rest-API refresh method in the Power BI model.
- The first step for using the Pipeline is to have the APP registered with Power Bi workspace and Model access.
- Then, with the APP, get the AAD Token for authentication.
- With the AAD Token, use the In-Built refresh POST methods in Rest-API for refreshing the required table and partition.
- To make the Pipeline wait till the refresh is complete, use the In-Built refreshes GET methods in Rest-API. Implementing GET methods within the pipeline to monitor the refresh status, ensures the process completes successfully.
- The Pipeline is built in a modular way, where workspaceID and DatasetID and Table name and partition name are passed.
-
The pipeline can call any model refresh until the API used in the Pipeline has access to the Model and Workspace.

What does each activity in the pipeline mean:
- Get Secret from AKV: This block of pipeline accepts the key vault URL and the secret name which has a secret for an app used to access Power BI. The output of this block is a secret value.
- Get AAD Token: This block accepts the input of tenant id, app id, and output of Get Secret from AKV which gives an output as a token through which enables access to the Power BI model.
- Get Dataset Refresh: This block accepts the input of workspace id, dataset id, body, and then token which we get from the 2nd block then this block triggers the refresh of the corresponding table and partitions that are passed through the body for the model. This block will follow the post method.
Until Refresh Complete:
- Wait: To ensure the refresh completes, this block checks every 10 seconds.
- Get Dataset: This involves inputting the workspace ID, dataset ID, and request body, following the GET method. The output is a list of ongoing refreshes on the model.
- Set Dataset: Assigning the output of the previous block to a variable
This block will run till the variable is not equal to unknown. - If Condition: This step checks if the refresh process has failed. If so, the pipeline’s execution is considered unsuccessful.
Refresh the selected partition using Azure Function:
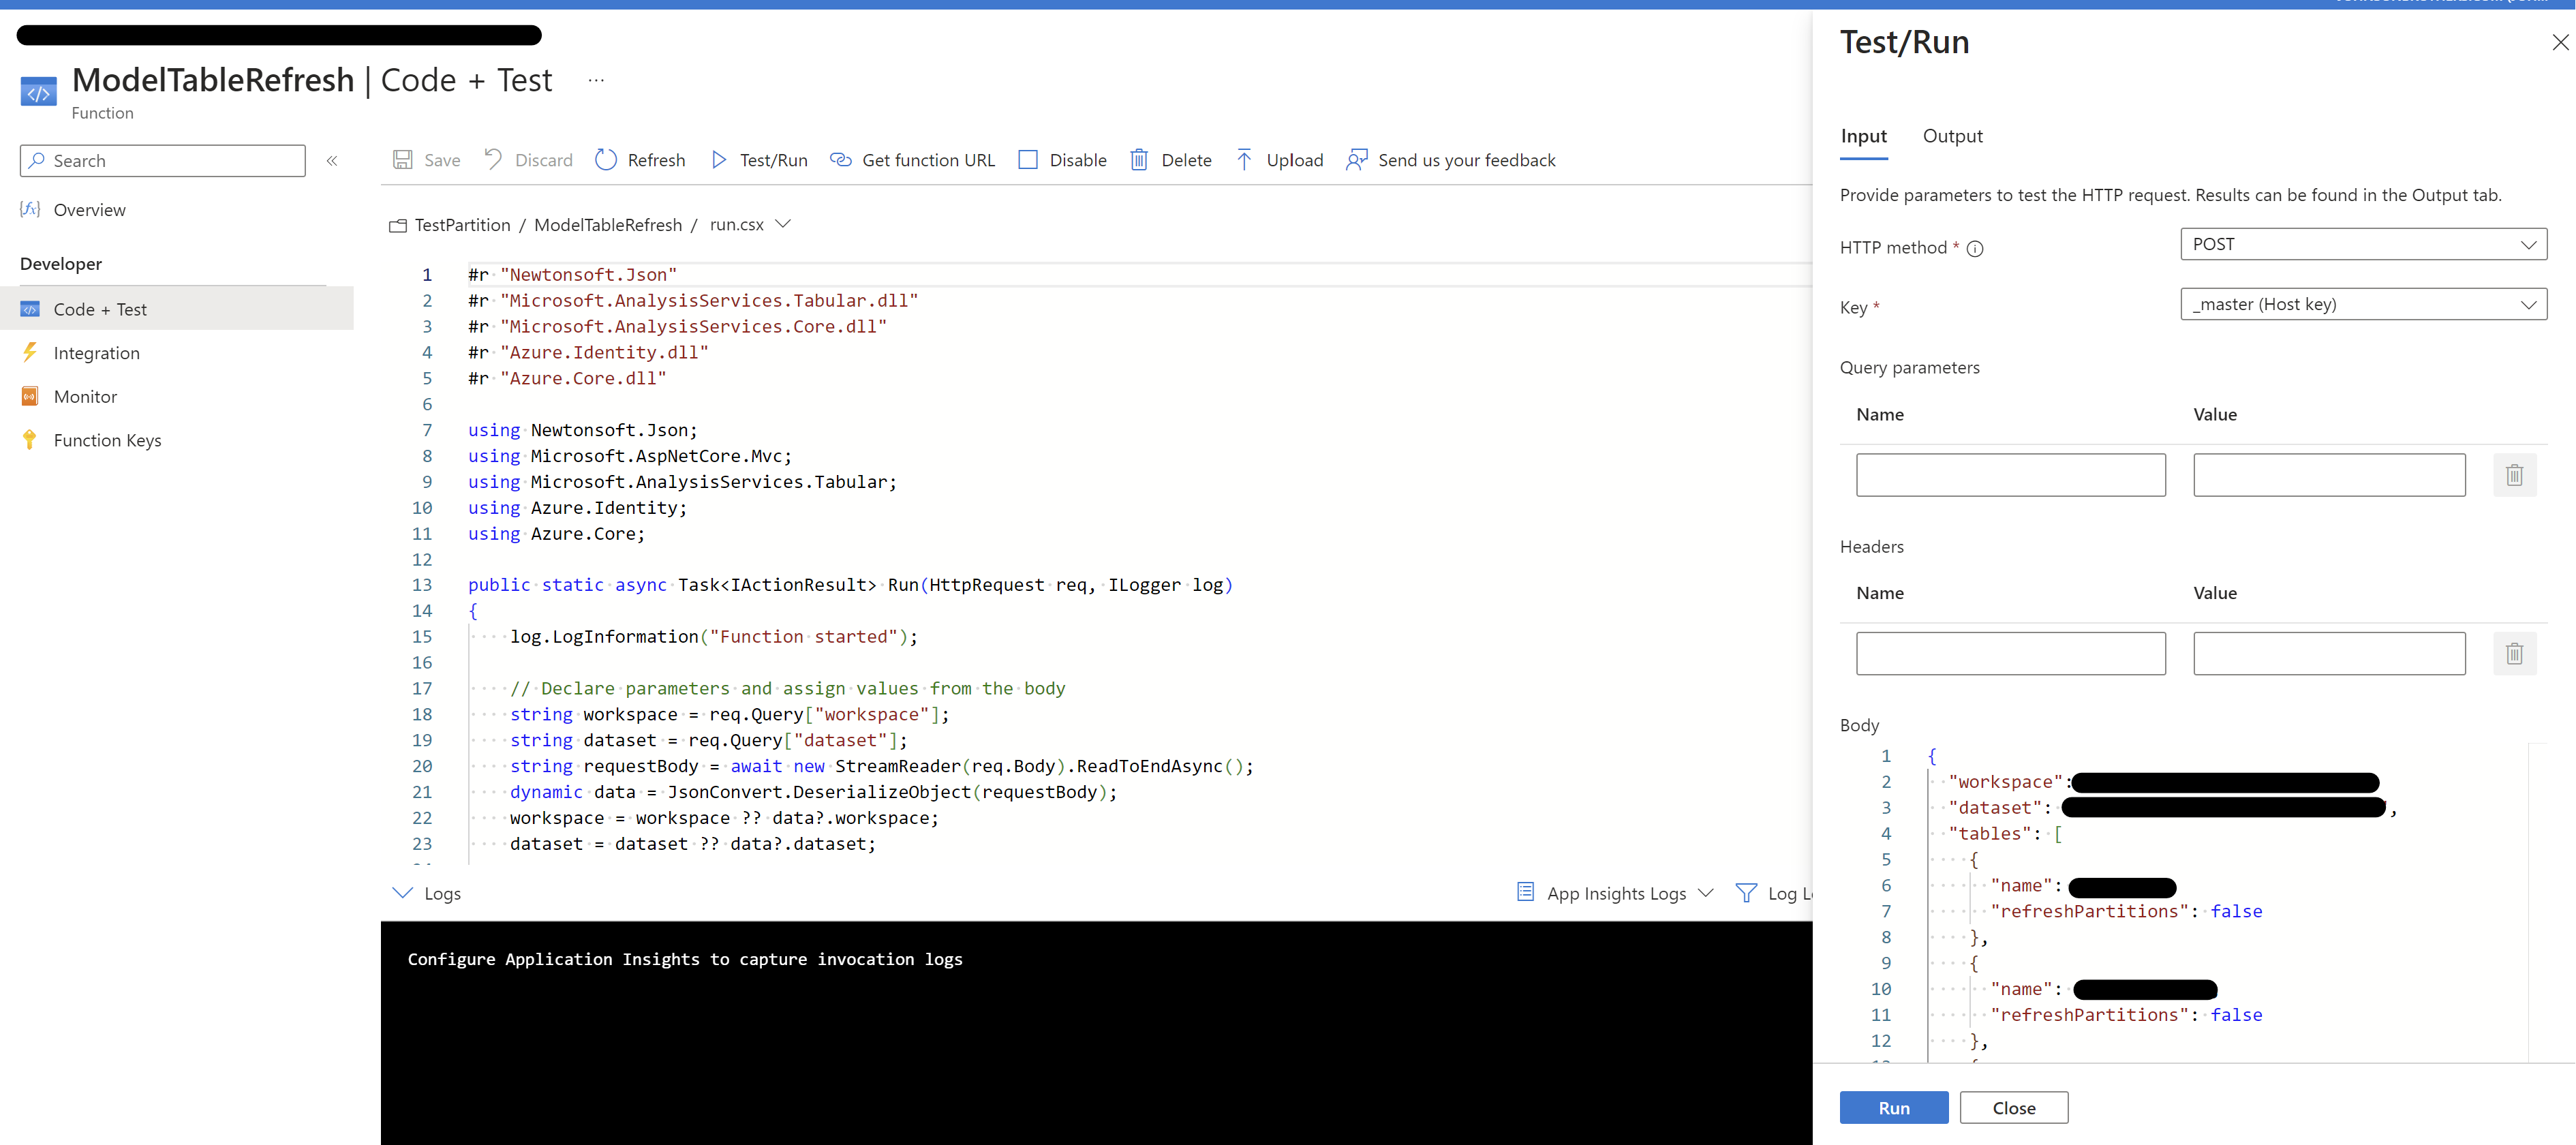
- Please follow the same steps as above from 1- 6 to create the Azure function for refresh.
- In the code+test pane add the c# code shared in the github.

Input body to the function:
{
    "workspace": "Workspace Name",
    "dataset": "Semantic Model Name",
    "tables": [
        {
            "name": "Table1RefreshallPartitions",
            "refreshPartitions": false
        },
        {
            "name": "Table2Refreshselectedpartitions",
            "refreshPartitions": true,
            "partitions": [
                "202402",
                "202403",
                "202404"
            ]
        }
    ]
}
Both Incremental Refresh and Custom Partitions in Power BI are essential for efficiently managing data susceptible to change within a large fact table. They allow you to optimize resource utilization, reduce unnecessary processing, and maintain control over partition design to align with your business needs. By combining these features, you can overcome the limitations of each approach and ensure a streamlined and effective data management solution.
References:
Note: Access the following GitHub link for Azure Function code, body which we pass for function and pipeline JSON files. Copy the JSON file inside the pipeline folder and paste that in adf pipeline by renaming the pipeline name as mentioned in the file, you will get the pipeline.
https://github.com/TirumalaBabu2000/Incremental_Refresh_and_Custom_Partition_Pipeline.git


