Institutional investors in real estate usually require several discussions to finalize their investment strategies and goals. They need to acquire properties on a large scale and at a fast pace. To facilitate this, the data pipeline must be refreshed in near-real-time with properties that have recently come onto the market.
With this business use case, we worked to get home listing data to the operational data store (ODS), PostgreSQL, and sync them to the cloud data warehouse, Snowflake.
We solve the first part of the challenge —collecting data about new property listings— by using a real estate data aggregator called Xome to exchange data and load them into the ODS.
Next, we feed the properties in the ODS in near-real-time (NRT) to the Snowflake data warehouse. An analytics engine filters and selects homes based on the buy-box criteria set by investors, enriched by supporting data such as nearby schools and their ratings; neighborhood crime levels; proximity to healthcare facilities and public transportation, etc. The analytics engine then ranks the properties based on the cap rate, discount, and yield.
The property ranks are sent back into the ODS, giving underwriters a prioritized list based on their ranking. Underwriters can adjudicate risks, calculate financials like the target offer price, renovation cost, and estimated returns, and store their results in the same ODS.
Here is how we built the NRT data pipeline from the Amazon Web Services (AWS) Postgres data source to Snowflake. Our solution:
- Uses the database log as the seed for transferring data, as it is minimally invasive to production systems;
- Employs Debezium, an open-source connector that listens for changes in log files and records them as consumable events;
- Transfers events reliably using Kafka, the distributed messaging system;
- Connects Kafka to Snowflake directly and writes to Snowflake using Snowpipe, stages, files, and tables; and
- Schedules Snowflake tasks to merge the final data sets to the target table.
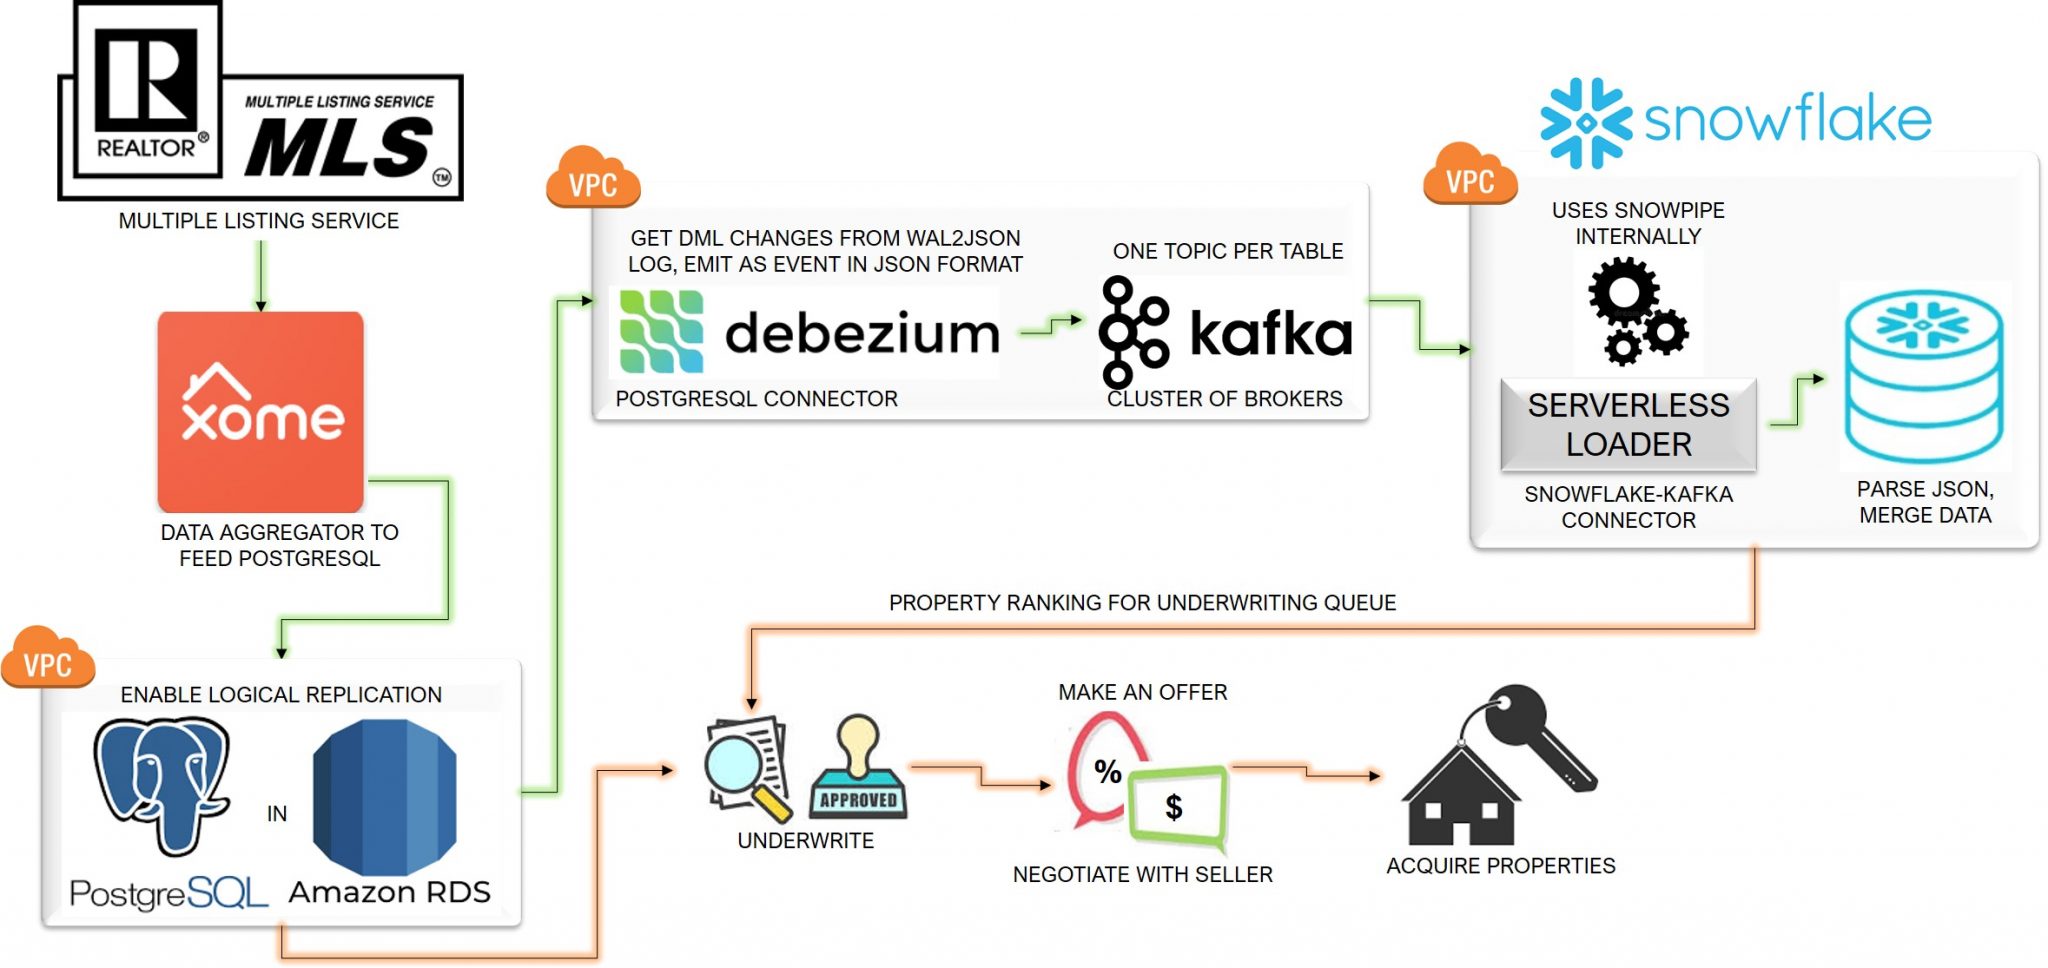
Solution architecture demonstrating the high-level flow and relationship between components
Here, step by step is how to do it:
A. Configure PostgreSQL in AWS RDS
1. To capture DML changes that persist in the database, set the Write-Ahead-Log (WAL) level to logical
Create a new parameter group and set the value of rds.logical_replication to 1.
Modify the database instance to associate to this customized parameter group.
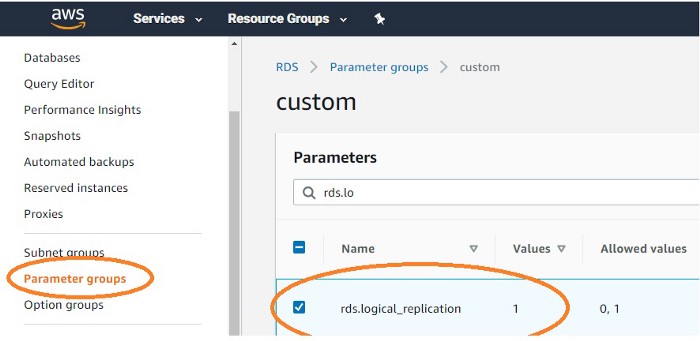
2. Log into PostgreSQL and check the WAL level
SHOW wal_level
It should be set to logical.
3. Create a replication slot to stream the sequence of changes from the database
The built-in logical decoding process extracts DML changes from the database log into a row format that is easy to understand.
SELECT * FROM pg_create_logical_replication_slot(, ‘wal2json’);
B. Configure the Debezium and Kafka cluster
We use Debezium and Kafka in a cluster as the event messaging system that reads data from the database logs and loads them into Snowflake.
To demonstrate this use case, we have selected the minimum hardware requirements to execute this data pipeline for a sample of records. To extend this to cluster size requirements for production data, please refer to the product documentation.

1. Prepare the hardware
For connector nodes, we use memory-optimized machines; for Kafka brokers, CPU-optimised machines with high storage capacity.
Install Java and open-source Kafka on all the machines and set up a $KAFKA_HOME directory.
2. Set up the Kafka-PostgreSQL Connector
This node connects to PostgreSQL and decodes the database log using the Debezium connector, returning events in JSON format. The node requires several JAR files to be downloaded from the Maven repository.
There are four configuration steps involved:
Config 1
 cd $KAFKA_HOME
 mkdir source_jars
 cd source_jars
 wget https://repo1.maven.org/maven2/org/apache/avro/avro/1.9.2/avro-1.9.2.jar
 wget https://packages.confluent.io/maven/io/confluent/common-utils/5.4.0/common-utils-5.4.0.jar
 wget https://repo1.maven.org/maven2/io/debezium/debezium-core/0.9.5.Final/debezium-core-0.9.5.Final.jar
 wget https://repo1.maven.org/maven2/io/debezium/debezium-connector-postgres/0.9.5.Final/debezium-connector-postgres-0.9.5.Final.jar
 wget https://repo1.maven.org/maven2/org/codehaus/jackson/jackson-core-asl/1.9.13/jackson-core-asl-1.9.13.jar
 wget https://www.java2s.com/Code/JarDownload/jackson-all/jackson-all-1.7.4.jar.zip
 wget https://www.java2s.com/Code/JarDownload/jdbc/jdbc-2.0-sources.jar.zip
 wget https://maven.repository.redhat.com/earlyaccess/all/io/confluent/kafka-avro-serializer/5.3.0/kafka-avro-serializer-5.3.0.jar
 wget https://repo1.maven.org/maven2/org/postgresql/postgresql/42.2.7/postgresql-42.2.7.jar
Config 2
In the $KAFKA_HOME/config directory, create a new file called postgres-kafka-connector.properties and establish a connection to Postgres to capture changed data.
There are multiple options to control the Debezium connector. Please consult the product documentation for more details.
For example:
 name=postgres-debezium-connector
 connector.class=io.debezium.connector.postgresql.PostgresConnector
 database.hostname= database.port=5432
 database.user=postgres
 database.password= ********
 database.dbname=postgres
 database.server.name= suppyTopic
 #This appears as prefix Kafka
 topicschema.whitelist = supply
 #Provide schema to sync data
 fromplugin.name=wal2jsonslot.name=
 #Provide Postgres replication slot name
 snapshot.fetch.size = 1000
Config 3
Set Classpath and execute
 export CLASSPATH=$KAFKA_HOME/source_jars/
 #Execute below from $KAFKA_HOME
 bin/connect-standalone.sh config/postgres-supply.properties config/postgres-kafka-connect-json.properties
3. Turn on Zookeeper
By default, Zookeeper runs on its localhost with Port ID 2181.
Start the Zookeeper process from $KAFKA_HOME.
bin/zookeeper-server-start.sh config/zookeeper.properties
4. Set up the Kafka brokers
In contrast to related technologies like Apache Spark, Hadoop, etc., Kafka does not use a master/slave concept for its brokers: all the brokers transparently work out how to coordinate amongst themselves.
Within the $KAFKA_HOME/config directory, find the template file called server.properties and edit the two Kafka brokers as follows:
 Config 1: KAFKA broker 1, Port no and ZooKeeper address
 server1.propertieslisteners=PLAINTEXT:<Public IP address of this Kafka broker 1>:9093
 zookeeper.connect=<Private IP address of Zookeeper>:2181
 zookeeper.connection.timeout.ms=6000 Config 2: KAFKA broker 2, Port no and ZooKeeper address
 server2.propertieslisteners=PLAINTEXT:<Public IP address of this Kafka broker 2>:9094
 zookeeper.connect=<Private IP address of Zookeeper>:2181
 zookeeper.connection.timeout.ms=6000
Start the Kafka brokers by running the following commands from KAFKA_HOME.
 #Run this from Kafka broker 1
 bin/kafka-server-start.sh config/server1.properties

 #Run this from Kafka broker 2
 bin/kafka-server-start.sh config/server2.properties
With this setup, the two Kafka brokers will transfer data from Postgres in topics, with one topic for each source table.
C. Set up the Snowflake connector
This node reads data from each Kafka topic and writes them to Snowflake. Internally, it uses Snowflake stages and Snowpipe to sync the data to the Snowflake tables.
There are four configuration steps involved:
Config 1
Download all the dependent JARs, including the Snowflake-Kafka connector, from the Maven repository and save them under a new directory, $KAFKA_HOME/sink_jars.
 cd $KAFKA_HOME
 mkdir sink_jars
 wgethttps://repo1.maven.org/maven2/org/bouncycastle/bc-fips/1.0.1/bc-fips-1.0.1.jar
 wget https://repo1.maven.org/maven2/org/bouncycastle/bcpkix-fips/1.0.3/bcpkix-fips-1.0.3.jar
 wget https://repo1.maven.org/maven2/com/snowflake/snowflake-kafka-connector/1.1.0/snowflake-kafka-connector-1.1.0.jar
 wget https://packages.confluent.io/maven/io/confluent/common-utils/5.4.0/common-utils-5.4.0.jar
Config 2
In $KAFKA_HOME/config/connect-standalone.properties, provide the details of the Kafka broker and its port.
 Config 2: connect-standalone.properties
 #Provide Kafka server details under this propertybootstrap.servers=ec2-X-YY-ZZZ-XXX.us-east-2.compute.amazonaws.com:9093,
 ec2-X-YY-ZZZ-XXX.us-east-2.compute.amazonaws.com:9092
Config 3
In $KAFKA_HOME/config, create a new file called kafka-snowflake-connect-json.properties. In this file, we tag each Kafka topic to its corresponding table in Snowflake, like this:
 snowflake.private.key.passphrase=<Password>#to connect Snowflake#Database and schema configuration
 snowflake.database.name=<Target database in Snowflake>
 snowflake.schema.name=<Target Schema in Snowflake> #Data format configuration
 key.converter = org.apache.kafka.connect.storage.StringConverter
 value.converter = com.snowflake.kafka.connector.records.SnowflakeJsonConverter #Provide a map from Kafka topic to table in Snowflake
 #We have two tables here. 1. Supply 2. BuyboxtopicsBuyboxtopics=postgresRDS.supply.supply,postgresRDS.supply.buybox
 snowflake.topic2table.map=postgresRDS.supply.supply:dbz_supply,postgresRDS.supply.buybox:dbz_buybox
Config 4
Set Classpath and execute.
 export CLASSPATH=$KAFKA_HOME/sink_jars/

 #Execute below from $KAFKA_HOME

 bin/connect-standalone.sh config/connect-standalone.properties
 config/kafka-snowflake-connect-json.properties
With this setup, data from the Kafka topics get loaded to the Snowflake target tables.
For example, the SUPPLY table that contains the list of homes in PostgreSQL will look like this in Snowflake:
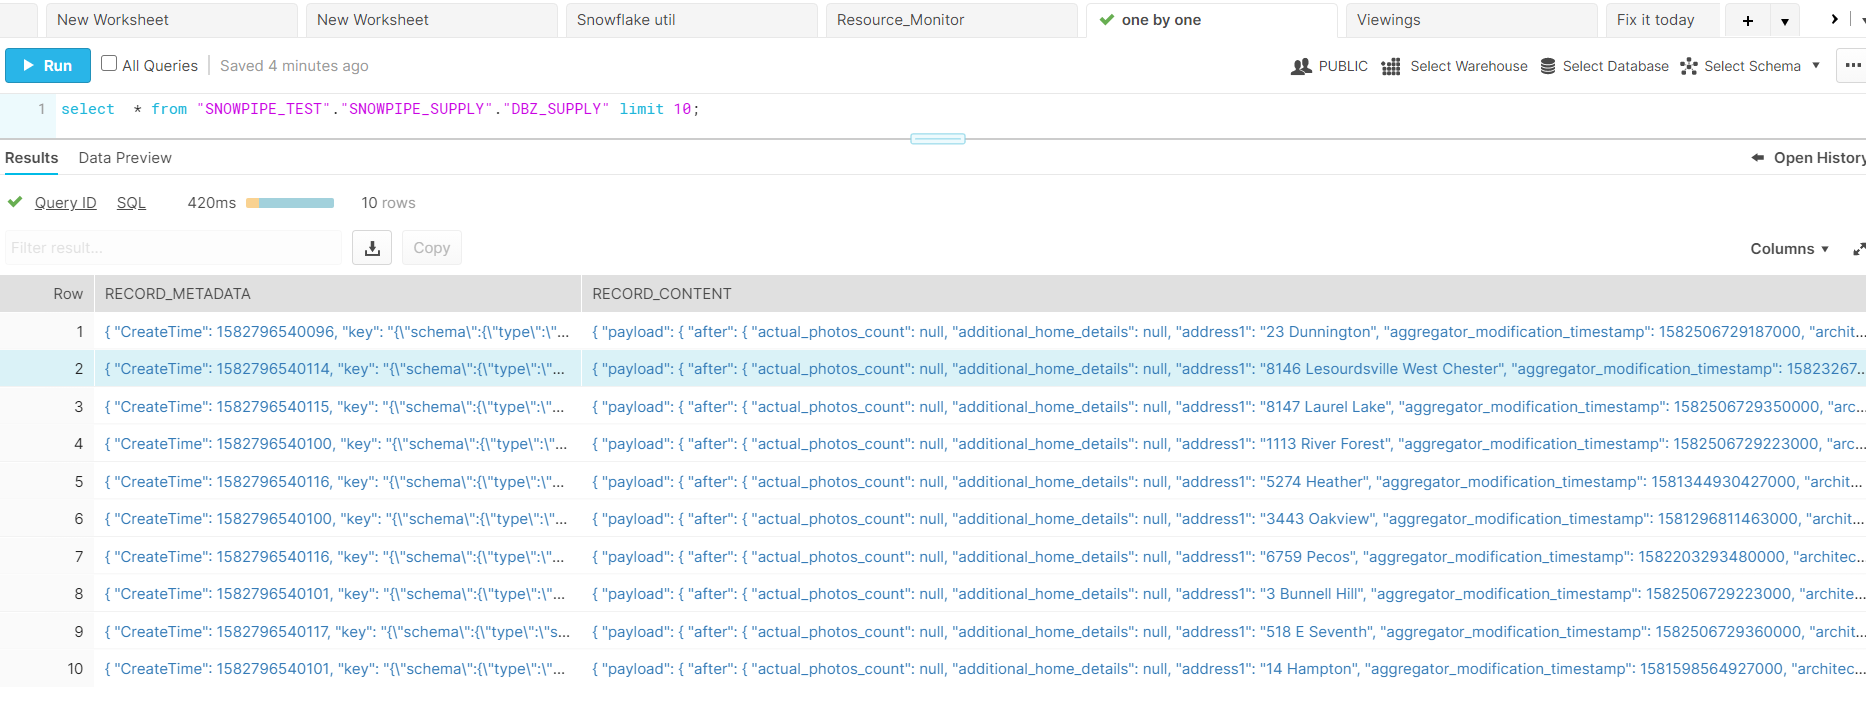
The table has only two JSON columns:
- Record_Metadata: JSON-formatted primary key column
- Record_Content: JSON-formatted actual row values
Real-time refresh
We want additions, deletions, and changes to the original data to flow down to Snowflake in real-time, or near-real-time. To achieve this, and to track the changes from original to updated data set, we use the following payload code:
 "payload": {
 "after": {
 "actual_photos_count": null,
 "additional_home_details": null,
 "address1": "8146 Lesourdsville West Chester",
 "bathrooms": 1,
 "bedrooms": 2,
 "census_tract_id": "390170111262013",
 "city": "West Chester",
 "close_date": null,
 "close_price": null,
 "country": "US",
 "created_on_utc": 1581089444809073,
 "latitude": 39.3491554260254,
 "laundry_features": null,
 ******DELETED ROWS to have few columns
 },
 "before": null,
 "op": "r",
 "source": {
 "connector": "postgresql",
 "db": "postgres",
 "last_snapshot_record": false,
 "lsn": 309438972864,
 "name": "postgresRDS",
 "schema": "supply",
 "snapshot": true,
 "table": "supply",
 "ts_usec": 1582796538603000,
 "txId": 5834,
 "version": "0.9.5.Final",
 "xmin": null
 },
 "ts_ms": 1582796538603
 }
The payload data structure has four event types:
- R: initial data extract
- C: inserts
- U: updates
- D: deletes
It holds the actual data in JSON nodes before and after.
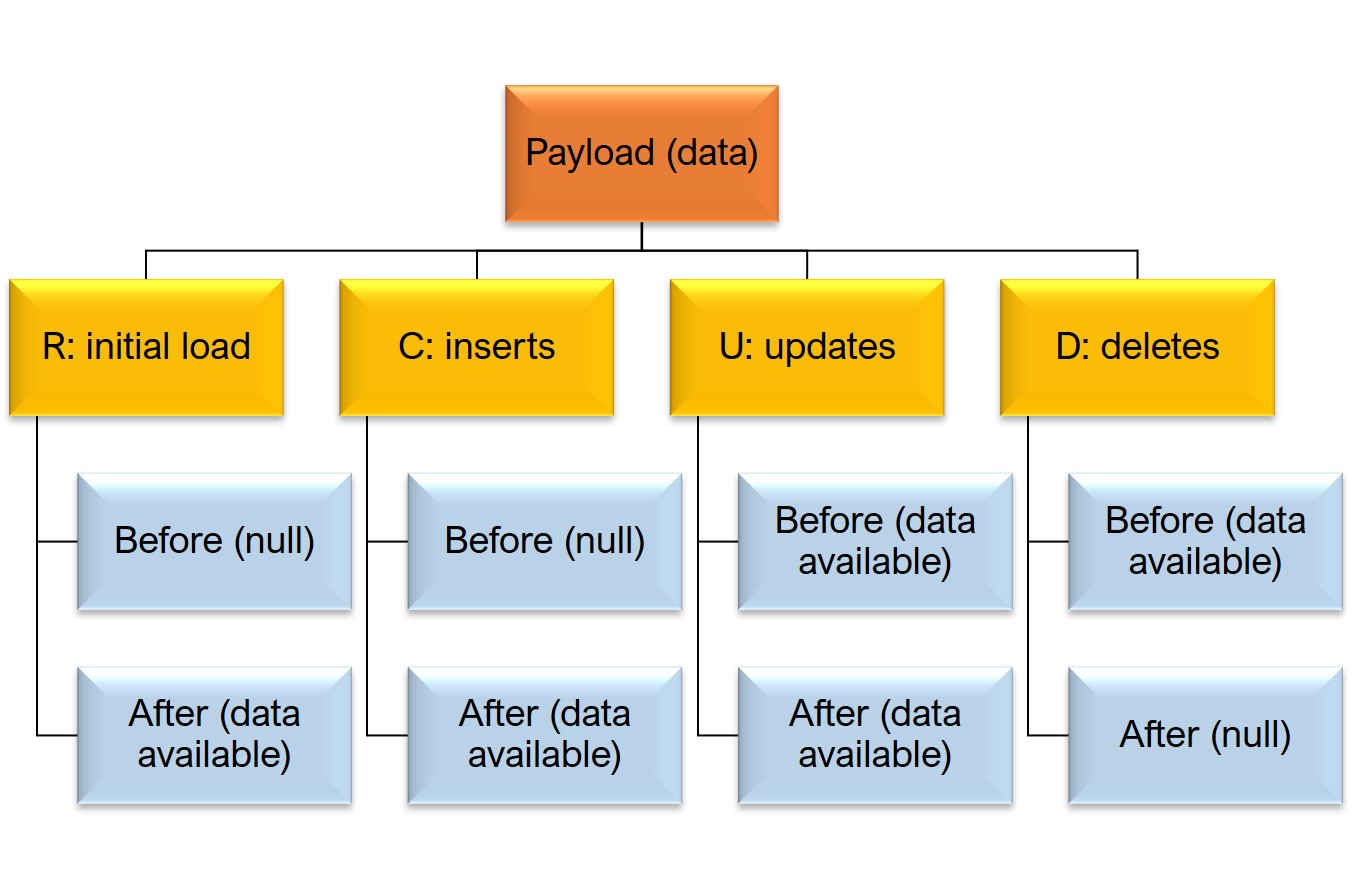
Debezium Postgres payload data and event types
D. Create views in Snowflake
Snowflake natively supports JSON structured data. We can parse and normalize data from the table into columns simply by using database views in Snowflake.
Create a view to parse inserts, updates, and snapshots
 CREATE OR REPLACE VIEW DBZ_SUPPLY_I_U_VIEW as
 SELECT --Get contents from After JSON node for snapshot, inserts and updates ID is the primary keyrecord_content:"payload"."after"."id"::FLOAT as id
 ,record_content:"payload"."after"."actual_photos_count"::FLOAT as actual_photos_count
 ,record_content:"payload"."after"."additional_home_details"::STRING as additional_home_details
 ,record_content:"payload"."after"."address1"::STRING as address1
 ,record_content:"payload"."after"."bathrooms"::VARIANT as bathrooms
 ,record_content:"payload"."after"."bedrooms"::VARIANT as bedrooms
 ,record_content:"payload"."after"."census_tract_id"::STRING as census_tract_id
 ,record_content:"payload"."after"."city"::STRING as city
 ,record_content:"payload"."after"."close_date"::STRING::DATE as close_date
 ,record_content:"payload"."after"."close_price"::VARIANT as close_price
 ,record_content:"payload"."after"."country"::STRING as country
 ,record_content:"payload"."after"."created_on_utc"::STRING::TIMESTAMP_NTZ as created_on_utc
 ,record_content:"payload"."after"."latitude"::STRING as latitude
 ,record_content:"payload"."after"."longitude"::STRING as longitude
 ,record_content:"payload"."after"."laundry_features"::STRING as laundry_features--Get additional fields, about timestamp when debezium captured data, when postgres applied that transaction,REGEXP_REPLACE(record_content:"payload"."op", '') as dml_operator ,
 , TO_TIMESTAMP_NTZ ( REGEXP_REPLACE(record_content:"payload"."ts_ms", '')) as debezium_processed_ts
 , TO_TIMESTAMP_NTZ ( REGEXP_REPLACE(record_content:"payload"."source"."ts_usec", '')) as source_processed_ts
 , REGEXP_REPLACE(record_content:"payload"."source"."name", '') as source_server
 , REGEXP_REPLACE(record_content:"payload"."source"."db", '') as source_db
 , REGEXP_REPLACE(record_content:"payload"."source"."table", '') as source_table
 , REGEXP_REPLACE(record_content:"payload"."source"."schema", '') as source_schemaFROM <Database>.<Schema>.DBZ_SUPPLY
 WHERE lower(DML_OPERATOR) in ('r','c','u');
Create a view to parse deletes
 CREATE OR REPLACE VIEW DBZ_SUPPLY_D_VIEW as
 SELECT --Get contents from before JSON node for snapshot, inserts and updates. ID is the primary keyrecord_content:"payload"."before"."id"::FLOAT as id
 ,record_content:"payload"."before"."actual_photos_count"::FLOAT as actual_photos_count
 ,record_content:"payload"."before"."additional_home_details"::STRING as additional_home_details
 ,record_content:"payload"."before"."address1"::STRING as address1
 ,record_content:"payload"."before"."bathrooms"::VARIANT as bathrooms
 ,record_content:"payload"."before"."bedrooms"::VARIANT as bedrooms
 ,record_content:"payload"."before"."census_tract_id"::STRING as census_tract_id
 ,record_content:"payload"."before"."city"::STRING as city
 ,record_content:"payload"."before"."close_date"::STRING::DATE as close_date
 ,record_content:"payload"."before"."close_price"::VARIANT as close_price
 ,record_content:"payload"."before"."country"::STRING as country
 ,record_content:"payload"."before"."created_on_utc"::STRING::TIMESTAMP_NTZ as created_on_utc
 ,record_content:"payload"."before"."latitude"::STRING as latitude
 ,record_content:"payload"."before"."longitude"::STRING as longitude
 ,record_content:"payload"."before"."laundry_features"::STRING as laundry_features--Get additional fields, about timestamp when debezium captured data, when postgres applied that transaction
 ,REGEXP_REPLACE(record_content:"payload"."op", '') as dml_operator, TO_TIMESTAMP_NTZ ( REGEXP_REPLACE(record_content:"payload"."ts_ms", '')) as debezium_processed_ts
 , TO_TIMESTAMP_NTZ ( REGEXP_REPLACE(record_content:"payload"."source"."ts_usec", '')) as source_processed_ts
 , REGEXP_REPLACE(record_content:"payload"."source"."name", '') as source_server
 , REGEXP_REPLACE(record_content:"payload"."source"."db", '') as source_db
 , REGEXP_REPLACE(record_content:"payload"."source"."table", '') as source_table
 , REGEXP_REPLACE(record_content:"payload"."source"."schema", '') as source_schemaFROM <Database>.<Schema>.DBZ_SUPPLY
 WHERE lower(DML_OPERATOR) in ('d');
You can automate the creation of these views using the Information Schema tables in Snowflake. To create stored procedures to automatically create these views for all tables involved in the data pipeline, please refer to the product documentation.
E. Merge the data into the target table
Using the two views, DBZ_SUPPLY_I_U_VIEW and DBZ_SUPPLY_D_VIEW, as the source, you can merge data to the final target table, SUPPLY, using the SQL merge command.
To automate this using Snowflake Tasks:
 CREATE TASK SUPPLY_MERGE
 WAREHOUSE <WAREHOUSE_NAME>
 SCHEDULE 5 MINUTE
 ASmerge into <Database>.<Tgt_Schema>.DBZ_SUPPLY as tgt
 using <Database>.<Src_Schema>.DBZ_SUPPLY_I_U_VIEW as src
 on tgt.id =src.id --Deletes
 when matched AND src.dml_operator='d' THEN DELETE --Updates
 when matched AND src.dml_operator='u' then
 update set tgt.ACTUAL_PHOTOS_COUNT =src.ACTUAL_PHOTOS_COUNT
 ,tgt.ADDRESS1 =src.ADDRESS1
 ,tgt.BATHROOMS =src.BATHROOMS
 ,tgt.BEDROOMS =src.BEDROOMS
 ,tgt.CENSUS_TRACT_ID =src.CENSUS_TRACT_ID
 ,tgt.CITY =src.CITY
 ,tgt.CLOSE_DATE =src.CLOSE_DATE
 ,tgt.CLOSE_PRICE =src.CLOSE_PRICE
 ,tgt.COUNTRY =src.COUNTRY
 ,tgt.CREATED_ON_UTC =src.CREATED_ON_UTC
 ,tgt.LATITUDE =src.LATITUDE
 ,tgt.LONGITUDE =src.LONGITUDE
 ,tgt.LAUNDRY_FEATURES =src.LAUNDRY_FEATURES--Inserts
 when not matched and src.dml_operator in ('c','r') then
 insert (ID, ACTUAL_PHOTOS_COUNT ,ADDRESS1 ,BATHROOMS ,BEDROOMS ,
 CENSUS_TRACT_ID ,CITY ,CLOSE_DATE ,CLOSE_PRICE ,COUNTRY ,
 CREATED_ON_UTC ,LATITUDE , LONGITUDE,LAUNDRY_FEATURES )
 values (src.ID ,src.ACTUAL_PHOTOS_COUNT ,src.ADDRESS1 ,
 src.BATHROOMS ,src.BEDROOMS ,src.CENSUS_TRACT_ID ,src.CITY ,
 src.CLOSE_DATE ,src.CLOSE_PRICE ,src.COUNTRY ,src.CREATED_ON_UTC ,
 src.LATITUDE ,src.LAUNDRY_FEATURES ,src.LONGITUDE )
This task is configured to execute every five minutes.
You can monitor it using the task history:
 select *
 from table(information_schema.task_history())
 order by scheduled_time;
The NRT data pipeline is complete!
F. Things to keep in mind3
When attempting to set up an NRT to respond to your own use case, here are a few caveats:
– All sources tables must contain the primary key to propagate DML changes. If you create tables without a primary key, be sure to request the source database administrator or application team to set one up for you using the data elements in that table.
If you are still unable to include a primary key, write a separate data pipeline to perform a full data load for your tables.
– PostgreSQL wal2Json database logs don’t track DDL changes (for example, new column additions and deletions).
However, the payload data available in JSON will contain values for recently added columns. To identify DDL changes within a given timeframe, you will need to code a separate process to use database metadata tables and/or query history to scan and capture DDL changes.
These events must be pre-processed before merging the usual DML changes on to the Snowflake data warehouse.
G. Success!
This CDC-based solution reduced the waiting time for new listings posted from a daily batch window to under 30 minutes, after which the analytics engine ranked the listings and pushed them to the queue using the investors’ criteria.
Underwriters could review the listings, estimate values, and successfully meet their target of completing 1,000 single-family home acquisitions for a large investor in a very short time.
Setting up the NRT data pipeline involves configuring multiple systems to talk to each other. If set up correctly, these components will work well together to handle this and many other use cases.
Gathering and compiling data from multiple sources and making them usable in a short time is often the greatest challenge to be overcome to get value from business analytics. Write to info@tigeranalytics.com so that we can help.
